Monday, August 26, 2013

Office clutter and a new gallery wall

Last Wednesday my kids all returned to school! My son started his freshman year in high school which had me a little nervous {my little man in that big school with all those big kids}. I have one daughter in middle school {7th grade} and my baby is in her last year of elementary school {5th grade}. Of course I was waiting at the door when each one arrived home to grill them about their day! As usual everything went great...no one got lost finding their classrooms, all lockers were opened with ease. So now that we are in week two I can relax a bit knowing they are fine. I guess it just goes to show that no matter how old they get us parents will never stop worrying about them. EVER!
 
 
What I really wanted to share with you today is the hot cluttered mess my office was last week! Over the summer I kind of let things slide and the clutter started to take over {which drives me crazy}.
 
You all remember what my office/craft space looked like when I first showed it to you awhile back.


It was so clean and organized, I was in love!
 
Then summer break happened and I got busy hanging out with my kids and my office became a little neglected.


It was driving me insane!
 
So once the kids were back in school the first thing I did was clean out my entire desk area.
I am an organized person by nature all of my crafting supplies and paperwork have a designated area. The problem was that things laid around on my desk for a couple weeks before I had the time {or energy} to put them away. My solution was to come up with an "in transition" space.


Now all that "stuff" has a place to go until I can put it away for good. For example papers that need to be filed in the filing cabinet have a home until I file them. When I print coupons they have a home until I can cut them and get them in my coupon binder. I even made a spot for my husband and all the odd's and end's he leaves around!
 
Luckily I already had the paper trays {previously used to store my scrapbooking paper in} and I just used glue dots to attach the labels to the fronts.
 
 
I also used some small bowls to contain paper clips and push pins that were constantly getting lost.
 
And since I was on my cleaning kick I decided to hang a little gallery wall over my expedit with frames and items I already had around the house.


Even though my office wasn't overly messy it was bothering me {a lot}! It feels so good now to be organized again and ready for another school year!
 
Thanks for hanging out with me today for awhile!
Hope you'll come back again!
 
                                                                                                  Amy
 
 
linking up to...


Thursday, August 15, 2013

Back to school shelf display

It's hard to believe that my kids will be returning to school next week. Just six more days until early mornings, packing lunches and homework! Although I am always sad to see the summer end it is nice to get back into a routine.
 
 
I have a small shelf in our entry hallway that I usually decorate to suit the seasons. I thought it would only be fitting to decorate a back to school display for the kiddos!


I got the idea for this notebook painted frame here. I painted my frame white and then used a red pen, blue pen, and a ruler to make the lines. I used some leftover cork to fill the frame and added a little school countdown.


I found the free Dr. Seuss printable here!
 
 
Now I'm off to clean up the paint mess my girls left me in the kitchen! Only six more days!
 
                                                                                                     Amy
 
 
linking up to...


Tuesday, August 13, 2013

Pinterest challenge...birthday yummies

Yep, I am officially the mother of a teen daughter! Why do our children have to grow up so quickly? I miss the days when I had three little one's running around the house. Now I have two teenagers and a ten year old.
 
Saturday was my daughter's thirteenth birthday and we celebrated with family and friends at a local park. After the party we took some of the older kids paddle boating!


My husband, daughter and myself at the party!


For the party I decided to keep the food simple and just grab some pizza's! I also wanted to try making just a few new items so I picked some recipes off Pinterest that I've been wanting to try.
 
I have a link underneath each picture if you would like the recipe. These were not my original creations!
 
 
My daughter loves hummus so I knew I had to try these . They were so easy to make and super yummy!


Two words...SUPER SWEET!


I was a little disappointed how mine turned out, not nearly as bright and colorful as the original. However, my youngest daughter and niece had fun helping me mix all the batter colors and the birthday girl loved them!
 
 
Thanks for stopping by!
 
                                                                                                Amy


Thursday, August 8, 2013

Worlds longest yard sale finds

Last Friday I loaded up my mini van with my three kids and my mom and headed out for the worlds longest yard sale.

Okay, we didn't really have to go that far since I don't live too far off it's route. Anyway, the five of us spent the good part of Friday driving and shopping. 

We saw some cool stuff and I regret not buying more, but I have a habit of talking myself out of things!

Here's what came home with me...


Total spent just $9.00

The white table is adorable it just needs a little TLC, and who can pass up inexpensive blue ball jars!


You'll for sure be seeing an "after" photo of that table in the near future.

Have a great day!

                                                                                           Amy

Friday, August 2, 2013

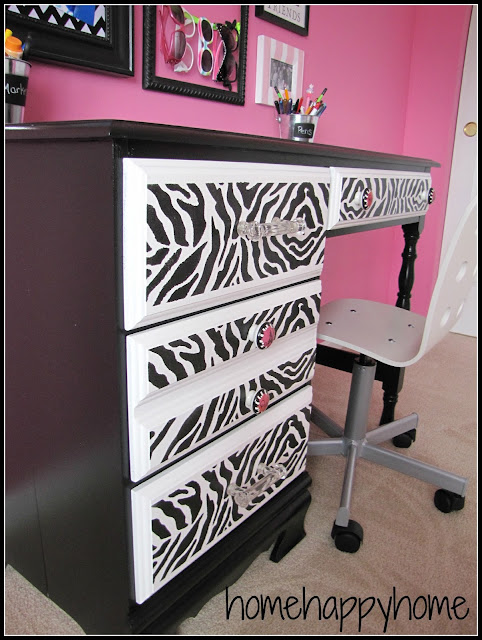
Zebra desk

Yesterday I shared my daughter's rearranged bedroom which included the zebra desk I painted. Today I want to show you how I did it.


We painted the inside of all the drawers pink for fun!


We started with just a basic wood desk from the local thrift shop. I gave the desk a quick cleaning and then my helper and I painted the inside of the drawers with leftover wall paint.


I gave the desk a coat of primer.

Once the primer was dry I gave the drawers a coat of white paint. The desk required two coats of black paint.

I found the zebra stencil at Hobby lobby {I paid less than $10.00 for stencil and sponge applicators}.

I taped the stencil on the drawer to keep it in place.

I went easy on the paint and just dabbed up and down.


I had to match up the pattern with the stencil to fill the negative space on the ends of the drawer.

Lastly we added some adorable knobs and pulls also from Hobby Lobby {wait until they are on sale for 50% off}.

Now my daughter has a desk that truly suits her taste and personality! It kind suits mine as well {well the younger me}!


Thanks so much for stopping by!

Have a wonderful weekend!

                                                                                         Amy

linking up to...
 

Thursday, August 1, 2013

Rearranged girls bedroom

This summer has been full of makeovers and projects {I'm ready for a break}. While I was working on my oldest daughter's room {here} my youngest decided she wanted to change her furniture around as well.

Okay, move furniture around how much work can that be?

Wrong!
First, I decided that I needed to paint her trim and baseboards white {that was a must do}.
Second, we moved some furniture out of her room and some new pieces in.
Third, we rearranged the furniture which meant all of the artwork had to be removed.
That brings us to fifth all holes had to be filled, sanded and repainted.
Sixth, artwork had to be hung.
Seventh, she decided she wanted a desk in her room like her sister.
Eighth, had to shop around thrift stores to find the right desk.
Ninth, had to paint desk.

Should I keep going? It felt like I had opened a can of worms!

You can't imagine how relieved I am to finally be done with both my girl's rooms!


Here is what her room looked like before...


The brown trim really needed painting and we repurposed the black bookcases in her sister's closet as organizers.

Here is what her rearranged room looks like now...


The desk was a thrift store find that I painted. Had to have more zebra!


I made the pallet art and the doggie printable was found here.


My daughter insisted that her bed go in front of the window.


Her shelves hold her painted pottery and other favorite items!


These cubbies were previously in her sister's closet.


Look at all that pretty white trim!


The fan stayed the same with it's pretty beading.


I spent around $100 in her room which included the new desk, chair, picture frame, and one piece of new artwork.

I wasn't thrilled about putting her bed in front of the windows but it really opened up the room and more importantly my daughter loves it!

Tomorrow I will share how I painted her zebra desk so make sure to check back!

Now I'm going to relax!

                                                                                              Amy

Linking up to...