Thursday, November 29, 2012

Finding the perfect lampshade

Recently when I was working on my master bedroom makeover I decided to keep my existing lamps and just change out the shades to save money. I thought it would be an easy task to just switch out the shades. Nope, it took me a solid week and many many trips to several stores to finally find the perfect lampshade.


I feel in love with the color and pattern on this shade but it was to large for the lamp.
I thought this one was perfect until I put it on my lamp. Way too small!
In the store I thought this shade would be too large, but when I got it home it was the perfect fit!


The nice people at Target probably thought I was crazy buying and returning shade after shade.

Moral of the story...do some research before heading to the store. Measure your lamp and existing shade!

I found some great tips here at shades of light. Such as, the diameter of the bottom of the shade should not be greater than the height of the lamp body (to bottom of socket). So if you are in the market for new shades I would suggest heading over and doing a little reading first.

Have a great day!


                                                                                                 Amy

Monday, November 26, 2012

DIY bed skirt

Happy Monday everyone! Hope you had a wonderful Thanksgiving!

Last week I very proudly showed you my master bedroom makeover.


It's hard to tell in the photo, but our bed is on raisers (long story but my dear husband wanted to be able to store one of his workout machines under our bed). When it came time to shop for new bedding and a bed skirt I couldn't find anything long enough. Standard bed skirts (aka dust ruffle, weird name) were way to short. So with little to no money to spend I decided to whip something up myself.

I headed to our linen closet and pulled out two rarely used white twin size top sheets. Then I cut each in half lengthwise.


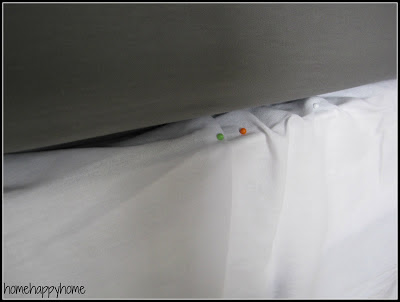
 I used pins to attach the sheet directly into our box spring. I used three halved sheets, one for each side of the mattress. The sheets were the perfect length and I could pin them to the correct height.
 I made sure to use the hemmed part of the sheet not the cut part as the bottom of the bed skirt. 


So far we've had our bed skirt on our bed for a month and it hasn't budged (even with kids hopping in and out of our bed).

I love FREE!

Have a happy Monday!


                                                                                                 Amy

Tuesday, November 20, 2012

Master bedroom reveal

Today I am finally ready to show off my newly decorated master bedroom! It took a little longer then I planned, but I am truly happy with the results. Plus, I was able to keep this makeover under my teeny tiny budget!

Just to refresh your memory here is a look at the BEFORE.
We simply moved in and unpacked and left the room like this for the past year and a half.


Here it is TODAY!


Just for fun I added some side by side shots.
BEFORE  AFTER 

As I mentioned earlier I was on a tight budget with this room. I saved money by using all of my existing furniture and painting it. I also shopped for bargains and threw in some DIY projects. I was able to complete this room for under $300.00 total! {cheering}

Here is my project breakdown

1. Paint for walls Behr elephant skin from Home Depot $80.00
2. white paint for trim and furniture already had
3. White duvet set from Target $79.99
4. White dust ruffle DIY project FREE
5. Lampshades from Target $34.00 for both
6. gallery wall frames from around house plus a few more from Michael's at 50% off just $20.00
7. Artwork DIY FREE
8. Curtain rods and hardware Ikea $17.00
9. Painted stripe curtains DIY with white panels from Target $20.00
10. Canvas artwork over armoire Hobby Lobby 50% off $15.00
11. Black baskets under nightstands Target clearance $24.00
12. Chevron window valance DIY already had fabric FREE
13. Accent pillow Hobby Lobby clearance about 6 months ago $5.00


Now I can actually enjoy spending time in my bedroom instead of cringing every morning waking up to bright gold walls!

Of course there are always things that can be done in the future {like a cozy little reading chair in the corner} but for now we are HAPPY! After a break I'll have to tackle our gold and blue master bathroom as well!

Thank you for coming by today!

                                                                                        Amy


Linking up this week...

Wednesday, November 14, 2012

Master bedroom progress

I am so excited to share with you that my master bedroom makeover is almost complete!
 
You know when you first start a project and you're all busy busy busy. Then you get to that midway point and you begin to lose your energy and slow down. Then finally you see the finish line in sight and get that last burst of adrenaline. That is how I've felt for the past month. Up down and up again. I've had fun though seeing all my planning come to life!
 
 
Today I am working on a curtain project for the room {sorry no more pics until the reveal}. Here is a recap of my room to do list.
 
 
Master bedroom
 
 
paint trim
 
paint room
 
paint furniture
 
find new {inexpensive} bedding
 
new or repurposed lamps
 
diy artwork
 
gallery wall
 
curtains
 
spruce up ceiling fan


It feels great to cross all those items off my list! Can't wait to share the finished room with you shortly!


                                                                                      Amy

Friday, November 2, 2012

A look back at my first year

It's hard to believe that I started this blog exactly a year ago today! I ask myself this question daily "where has the time gone"?

I began blogging a year ago because we had recently purchased our forever house and I wanted a way to document the journey of making a house our home. I never imagined it could be so much fun or so much work! I'm still amazed when I read your nice comments and think "wow someone out there likes what I'm doing". My blog might not be well known or have a ton of sponsors {or any}, but I don't mind I kinda love it just how it is. 

So in honor of my blogiversary I am going to share some of my favorites from the past year! 


One of my first projects was painting the stripe curtains for our family room. I actually love those curtains so much I plan on making another pair next week for a certain room in my house!


One of my favorite rooms in our home is my daughters room, if I were a little girl again I would want her room! We've made a few changes since I posted this and I'm hoping to share some updated photos with you soon.


Another early on project was decorating my children's bath room.


One of my all time favorite makeovers was my striped entry. The difference is amazing and I still love it today!


I also shared my favorite room in our previous home and why it was so special to me.


One of my favorite art projects was the domino art I made for our basement makeover.


I enjoy planning parties and shared my daughter's mad hatter tea party and my carnival ideas!


Honestly I could sit here all day because I've come to realize that almost all of my projects and makeovers are my favorite!

I want to thank all of you who have been reading my blog for a year or just a few days! You make blogging so much fun for me and I always look forward to hearing your responses to my makeovers and crazy ramblings {we've all had our share of those}. THANK YOU!

Have a fantastic weekend!

                                                                                           Amy


Linking up this week to...

Thursday, November 1, 2012

Pinterest challenge pumpkin birdfeeder

This afternoon my daughter and I attempted another Pinterest challenge!

I came across this idea a few days ago and thought it would be the perfect thing to do with some of our leftover pumpkins. Plus this was something fun that my daughter could help me with.

We started by cutting a cleaned out pumpkin in half. Then filled it with bird seed and used some jute rope to string it to the tree {we were quite the scene trying to attach that rope to our tiny tree}!


My helper {she thought she looked like a lion}.


The first time we used a large pumpkin without thinking that it had to hang in our wee little tree. Luckily we also had a small pumpkin that was the perfect size!

It was a quick and simple project to do with my daughter, can't beat that!


                                                                                           Amy


Linking up this week to...