Tuesday, January 31, 2012

Behind the scenes

Yesterday I revealed the foyer makeover  I did for the Imagine the Impossibilities challenge. Today I'm going to go behind the scenes of my makeover!


If you remember my foyer before was very plain and boring. The first thing I did was paint all the brown trim and railings in a soft white paint. I gave all the woodwork a light sanding with some sandpaper (I didn't go crazy, just spent a few minutes on each piece).  To ensure I got a nice clean line and no paint on the walls I taped off all the walls and hardwood flooring. On the carpeted area I used pieces of cardboard and slipped them underneath the trim. To save time I skipped using primer and instead used a paint and primer in one! I let each coat dry completely before doing another coat. Three coats later I had beautiful white trim!


Painting the stripes on the wall was actually a lot easier then I thought it would be. I started off by measuring my wall from ceiling to top of the baseboard. Mine was 93 inches, I then divided this by 9 ( I already knew I wanted 9 stripes) which came to roughly 10.25 inches. Starting at the ceiling I measured down 10.25 inches, marked it, and then worked my way down the wall. With the help of my husband I used a chalk line to mark my lines.


Then it was time to tape off the stripes. Remember to always put the tape on the outside line on the stripes you will be painting. This sounds confusing but if you try it you will see what I mean! I recommend using the green Frog tape for taping your lines it worked really well with virtually no paint bleeding through! I didn't wait for the paint to dry completely before I started pulling off the tape. Pulling off the tape to reveal crisp lines was so exciting!

Super HAPPY with the makeover and still in disbelief that I actually finished everything I set out to do!

I've already joined the Imagine the Impossibilties link party at it all started with paint!

Have a great day!

                                                                                             Amy
Monday, January 30, 2012

striped entry reveal

Today is the big day, I am revealing the foyer makeover I did for the imagine the impossibilities challenge!

Last week I kept you posted on my progress as I transformed our entry from blah and boring to bright and bold!

BEFORE


AFTER


I am LOVING my new foyer! 

As it turned out painting the stripes on the wall wasn't as difficult as I thought it would be. The hardest part was painting all the brown trim over and over again ( three coats). All the hard work was definitely worth it!

Thank you ladies for throwing down this challenge or I may have never gotten up the nerve to start this project.

Can't wait to link up for the big party on the 31st! Please see side bar to find out what sites to visit. I am sooo looking forward to seeing how everyone else did with their challenge!

                                                     
                                                                      Amy


linked to...classyclutter

Friday, January 27, 2012

I dream of a closet like this

I just wanted to thank everyone who has been following my Imagine the Impossibilities challenge this week. I am thrilled to report that my challenge is COMPLETE, FINISHED, DONE!

Wednesday I finished up on the trim work and got the front door painted. Yesterday I conquered the striped wall! It looks AMAZING!

I will be sharing my entry makeover on Monday so I hope you will come back and check it out.

There is one space in my entry that I didn't touch, the hall coat closet. Our closet is a hot mess! It's one of those spaces I don't let anyone see! We are hoping to add on a small mudroom in our garage sometime this year, and when we do most of the coats and clutter from our hall closet can be relocated there. Then and only then will I attempt to makeover our closet. Until then I can dream...


source

source

source

source

source

Someday... I will have an organized closet like this.

As I mentioned earlier I am super excited to share my entry makeover with you on Monday! I am also looking forward to checking out the big blog party (see sidebar) to see what challenges everyone has been up to.

Hope you all have a fun and safe weekend!

                                                                                    Amy

Wednesday, January 25, 2012

The challenge continues...

Wow! It's amazing the difference one little can of paint can make. Yesterday I spent many hours painting away on the trim. I used a paint and primer in one which seems to be working well. I did two coats yesterday and I have one final coat to do today and then I can get started on the stripes.

I don't want to give too much away, but here is a little sneak peak.

I am loving the white trim it looks AMAZING! The only bummer is I still have an entire house of brown trim!

Anyway, I thought I would share some of my inspiration for my foyer makeover.


source
I would love to have a little table or piece of furniture in my foyer.


source
I am so loving her stripes. I had to show my husband this photo because he didn't understand what I meant by painting stripes in the hallway!

source
I can't get enough of these stripes. So lovely.

source
What don't I love about this entry. Crisp white trim, black door, even loving the zebra rug!

source
The extra molding over the door is AWESOME!

Now it's time to get back to work  painting. I'll be back tomorrow with another update on my Imagine the Impossibilities project.

                                                                                     Amy

Tuesday, January 24, 2012

Foyer progress challenge update

I may have underestimated how much work it is to paint trim. Yesterday I managed to sand the trim in the hallway, foyer, and the staircase. I was also able to tape off the walls and floors so I won't get paint on them. I also had my husband remove the door to our main floor bath so I could paint the trim around the door as well. This afternoon I'll be heading to the home improvement store to get the paint! This is what my entry looks like right now.

To keep me motivated and on track I posted my to do list in our kitchen!

I would also like to thank Katie from Creatively Living and Terry from Cherished Treasures for featuring my children's bathroom this week. Thank you ladies! If you missed that reveal you can find it here.

                                                                                           Amy

Monday, January 23, 2012

Imagine the impossiblities

Have you heard of the imagine the impossibilities challenge? It is being hosted by six lovely bloggers;
  • Andrea from the cottage market
  • karah from the space between
  • Kari from Thistlewood Farm
  • Kelly from Eclectically Vintage
  • Linda from It all started with paint
  • Stacey from A sort of fairytale
Have you ever had a project or idea that seemed impossible? Maybe recovering a piece of furniture, learning to sew, painting kitchen cabinets...you get the idea.

The imagine the impossibilities challenge is to motivate you to face your fear. Conquer that project you keep putting off because it just seems too scary or overwhelming.

All the ladies are conquering a fear and sharing their progress on their blogs with a huge blog party on January 31 to reveal their final projects along with others who have vowed to take the challenge as well.

I decided to join the challenge also! My challenge might not seem scary to you, but to me it seems overwhelming.

Drum roll please...
My challenge is to paint horizontal stripes in my entry hallway.

I've always loved the look of striped walls, but all the measuring and taping seemed like too much work. This challenge has motivated me to just get off my behind and do it.


Then I thought to myself "why stop there". My entire foyer could use a little pizazz! So I am extending the challenge to include my entire entry. 


I absolutely dispise all the wood trim and dream of having beautiful white trim in it's place. I'm also thinking about painting the front door black!

I'm not sure if I can get all this done before the big linky party on January 31st, but that's not going to keep me from trying!

What about you? Do you have any projects that you keep putting off? Hope you'll join the challenge and let me know what your project will be.

Happy Monday!

                                                                                           Amy

Friday, January 20, 2012

Smash book

So I'm walking around Michael's the other day and I happen to see this display on the end of the aisle.
WOW!


I'm thinking to myself "this looks so cool, why haven't I heard of this before?"  I'll admit my scrapbooking has taken a backseat to other things since we put our house on the market last winter and moved in the spring. These albums look like so much fun to put together. You can use anything; photos, memorabilia, doodling, journaling. No rhyme or reason which really appeals to me.

So when I got home I hit the internet and discovered these awesome Smash Books have been around for awhile. There is even an entire website dedicated to sharing everyone's creations. You must check it out at smash stories blog.

Here are some I found online...


source

source

source
I am really excited to get started on my own smash book. I was even thinking of getting them for my daughters. Once I get started I'll share some of my pages with you!

Do any of you have a smash book? Let me know what you think I would love to hear from you!

We are supposed to get some snow this evening so I'll try to stay warm and cozy. I'll probably end up spending most of the night pinning things on Pinterest.

Have a great weekend.

                                                                                             Amy

Thursday, January 19, 2012

dot to dot

Today I am sharing how I painted the polka dots in my children's bathroom.


I used a piece of heavy scrapbook paper to make my stencil or you could also use construction paper. I then used my scrapbooking circle cutter to cut out the size of polka dot I wanted. If you don't have one of these you could trace a small bowl or other object onto your paper and then carefully cut it out with scissors.

 I used clear packaging tape on the sides of my stencil to hold it to the wall.

I used a small foam brush to paint around the edges of the stencil. The trick is to go easy on the paint (too much paint and it will leak under the stencil). When going around the outside of the circle I just dabbed the foam brush up and down (no brushing back and forth). Then I used a small paintbrush to fill in the inside of the polka dot (this I did brush). Then I gently peeled off the tape and moved on to the next one!


Very simple to do and FREE (one of my favorite words)!

I almost forgot, when making your stencils make more than one. In this small area I used two paper stencils just because when one gets too much paint on it it doesn't work as well. If you were going to do a large wall or even a whole room you should probably make several stencils.

Did I mention how much I love paint! It is such an inexpensive way to change a room.

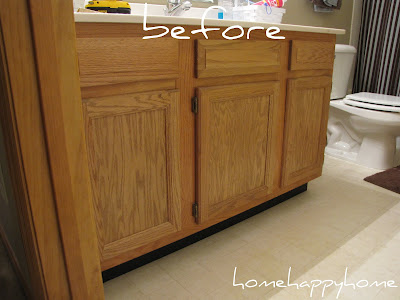
You probably noticed I also painted the bathroom vanity. I was able to complete this in just one afternoon.

Painting oak cabinets is such an easy fix and makes a huge difference.
  • remove all doors, drawers, and hinges
  • give everything a light sanding with sandpaper
  • I used one coat of primer (let dry completely)
  • one coat of paint (let dry completely)
  • another coat of paint
  • put hinges and doors back on

wall paint color Valspar khaki flat
vanity and polka dots paint color Behr rocky mountain sky semi-gloss

As always I do appreciate you stopping by!!!


                                                                                     Amy

Wednesday, January 18, 2012

my children's bathroom reveal

Today I am sharing what I have accomplished in my children's bathroom so far.

For the life of me I cannot find a before pic of this room. When we toured our house I took lots of photos, but my digital photo organization needs some work.

I mentioned yesterday that I started decorating this room over the summer, but got sidetracked by other things. I decided I finally need to finish this room for good! So here is what the room looks like today!


I am loving all the changes and it suits my children as well. When they were little we did the traditional kiddy bathroom (you know the one's fish, monkey). Now they are older (I have two in middle school) and they need something a little more grown up. I also have one boy and two girls so it had to be a bit gender neutral.

I was at a loss as to what to do with the blank wall over the bathtub until yesterday. I came across Desiree's craft room at the 36th avenue and fell in love with her polka dot wall. I knew this would be perfect in the bathroom. It adds just a hint of whimsy and fun to the room!

Tomorrow I will be sharing how I made my polka dots without using a store bought stencil. Super easy and FREE!

Before I go I must share photos of my daughter's bathroom drawer.


I lined the vanity drawer's with woven place mats I found at Michael's in the dollar section! They were the perfect length I just had to trim about an inch off the width. It then became the perfect place to organize all the girls hair pieces.

Hope you will join me tomorrow!

                                                                                 Amy